How To Fix: Recover Data From a Scratched or Damaged CD or DVD
DISCLAIMER: These examples use techniques that I actually employ in the real world to deal with real problems. They might be wrong or dangerous. They might be inefficient. If you try them yourself, it might cause damage or irreparable loss. I take no responsibility for anything you do based on my examples or the information that I provide here.
In the course of repairs that my clients ask me to perform, occasionally I am confronted with a CD or DVD that they wish to get the data from but are having difficulty.
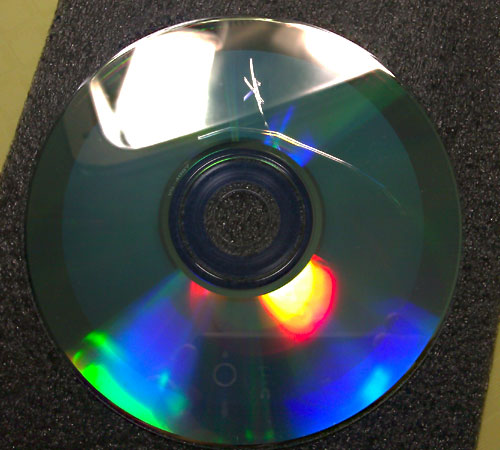
There are many reasons that this can happen such as scratches, dirt, ink seeping through from the label or even cracks.
IF THE CD/DVD IS CRACKED, BE PREPARED FOR THE POSSIBILITY THAT IT MAY SHATTER IN THE DRIVE. SINCE TIME MAY BE LIMITED, YOU PROBABLY WANT TO MOVE STRAIGHT TO ATTEMPTING TO IMAGE THE DISC AND HANDLE IT AS LITTLE AS POSSIBLE.
I have lost two optical drives to exploding discs. Both times the discs were badly cracked and attempts were made to limit the speed and maintain the best possible balance but they still exploded. Fortunately a large amount of data (all of it in one case) was recovered prior to the disc self destructing.
Normally though, I encounter discs that are scratched and scuffed to the point that they are no longer readable. Often you can view the disc and the files on it but any attempts to open or read the files gives an error.
Let’s make a mess.
First, we’ll make a CD with some public domain documents, video and audio files.
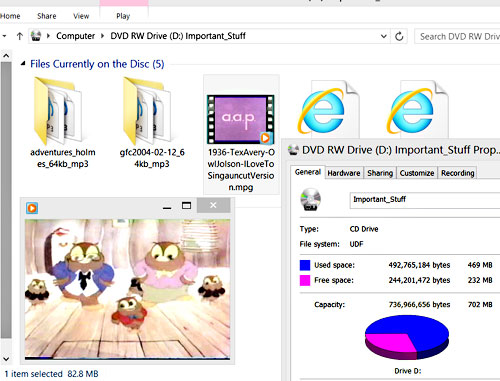
Then we’ll damage it by slicing the surface with a knife held at an angle to simulate really bad scratches.
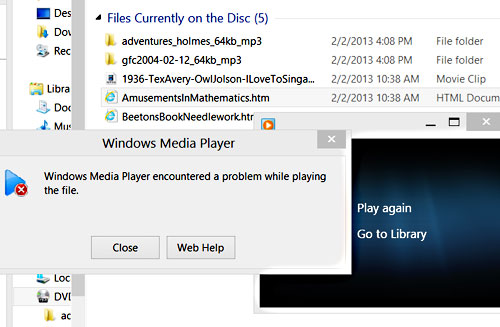
Now the disc does show the list of files on it but trying to access them does not work.
Clean it
The main rule for cleaning is simple to state but may be difficult to execute.
DO NOT MAKE THE DAMAGE WORSE
That’s all you need to do when cleaning. Simple, no?
Not always 🙂
Here is how I proceed with cleaning. Usually I stop after the first step. They rarely seem to require any kind of scrubbing or wiping so I avoid it as much as possible.
REMEMBER TO STOP WHEN IT SEEMS AS CLEAN AS IT WILL GET. YOU DO NOT NEED TO DO ALL OF THESE STEPS
- Rinse with warm water. Blot dry with soft cloth.
- Rinse with warm water. Smear with a gentle soap like baby shampoo. Rinse with warm water. Blot dry with soft cloth.
- If there is gunky sticky residue on it that must be removed try a cotton swab and some Unscented Isopropyl Alcohol BE GENTLE.
Let me to repeat the main rule of cleaning.
DO NOT MAKE THE DAMAGE WORSE
You are removing foreign material, not altering the physical state of the disk.
You are not trying to buff out scratches.
Try reading the disc again
MAKE SURE THE DISC IS COMPLETELY DRY
Sometimes cleaning is enough to give you an opportunity to copy all of the important files from the disc.
If you have access to multiple optical drives try them all. They can differ in quality and I have found some to be excellent at reading damaged discs that others simply won’t read.
Make a rescue image of the disc
You still can’t read the disc. Sorry to hear that but there is hope.
Tools
If a free tool helps you, please
donate to the people who created it.
PartedMagic by Patrick J. Verner
(Free)
GNU ddrescue (Free, included in PartedMagic)
To get started, download and burn a PartedMagic BootCD/DVD
and boot the computer with it.
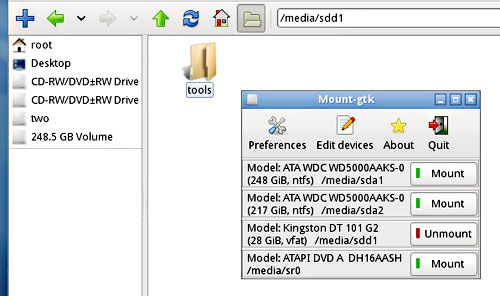
In this example, we’ll make the image on a USB flash drive plugged into the computer so we will need to mount the partition on that which is, in our case, /media/sdd1. We’ll use the MOUNT DEVICES button in the lower left hand corner of the desktop to open Mount-gtk and then press the MOUNT button next to /media/sdd1.
Make an image with GNU ddrescue
Now we can open a Terminal window by clicking the monitor icon next to the MOUNT DEVICES icon in the lower left corner of the desktop.
We will do this in at least two passes. The first one will simply get all of the data that is easy to read and in good shape. For this pass we type in the command…
ddrescue -n -b 2048 /dev/sr0 /media/sdd1/mystuff.iso
/media/sdd1/mystuff.log
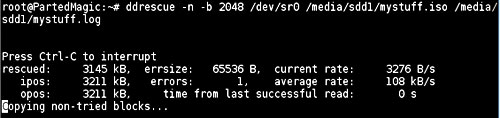
ddrescue : The ddrescue command
-n       : Tells it not to split failed blocks which would dig
deeper into the problem areas but it does still attempt to trim
failed blocks.

-b 2048  : Sets the block size to 2048 which is the standard
block size for CD/DVD

/dev/sr0 : This is the optical drive with the bad CD in it
(other versions of Linux may call this something else such as
/dev/cdrom)

/media/sdd1/mystuff.iso : The recovered ISO file which will
be saved on our flash disk.

/media/sdd1/mystuff.log : The log file which will be saved on
our flash disk and will allow us to stop and resume the recovery
whenever we wish without having to start from the beginning again.
It finishes in about 20 minutes but it does not look good. While it recovered about 310MB of data, it was not able to recover 155MB so we are still missing a third of our data.
At this point, we can try mounting that ISO and see what is on it. In this case, I found many files were intact but some of the audio books had large gaps in them or would not play at all even though they appeared to be the right size (since ddrescue fills the errors with empty spaces).
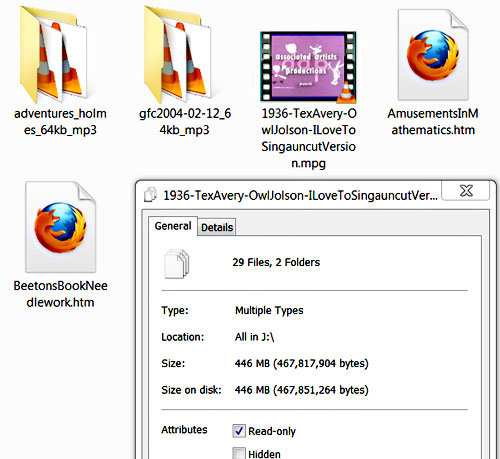
You can go through the files and if the important files that you want are intact and not damaged then you can recover them and you are done. However, if like in my example, the files you want to recover are damaged then you need to continue on to the second pass. It is often much more time consuming than the first pass was.
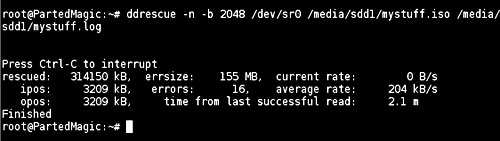
Second Pass
This time in the terminal we type
ddrescue -d -b 2048 /dev/sr0 /media/sdd1/mystuff.iso
/media/sdd1/mystuff.log
We removed the -n so this time it will dig deeper to recover errors and we are using -d to give us direct access to the drive without any caching.
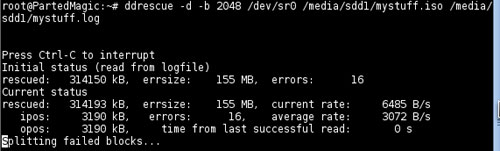
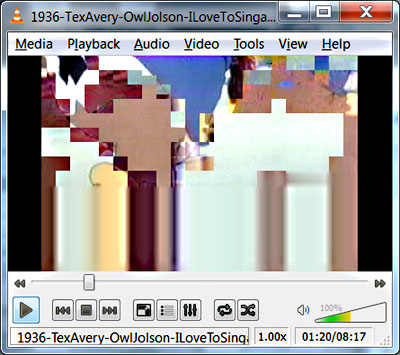
After 24 hours (almost to the minute) it finished but was still unable to get 21MB of the data. That is a lot better than the 155MB that was missing after the first pass. When we mount the image, everything is fine except the cartoon. It is still messed up and corrupted in some parts. It is 86MB so 21MB is about a quarter of it. Playing it works but there are sections where the image or audio is corrupted and scrambled.
Try another CD/DVD player to get even more
Third Pass
I have a very good external optical drive that I can use to try to get some more of that data. Here we hook it up and attempt a third pass using the same command as we did for the second pass (we change the source path to the external optical drive) and we add -r 3 to have it retry all the data that it could not get before three more times.
ddrescue -d -r 3 -b 2048 /dev/sr1 /media/sdd1/mystuff.iso
/media/sdd1/mystuff.log
After 24 hours that only got us another 2.2MB so there is still about 18MB missing. It never even finished completing the first retry in that time.
Fourth Pass
Next we try a standard internal drive from an old broken computer that we hook up externally with a PATA/USB bridge. I don’t expect it to do much but let’s try it.
Again, the external drive is detected in PartedMagic as /dev/sr1 so we use the same command that we used for the third pass.
ddrescue -d -r 3 -b 2048 /dev/sr1 /media/sdd1/mystuff.iso
/media/sdd1/mystuff.log
Wow! After 24 hours an additional 5MB of the worst damage is recovered so there is only 13MB left that is a recovery of 97.2% of the data. We’ll let this one run for a while longer. After another 12 hours we get another 2MB and that seems to be the extent of our recovery efforts with these tools and drives.
First pass 20 minutes 155MB missing out of 470MB 33% data lost
Second pass 24 hours 21MB missing out of 470MB 4.5% data lost
Third pass 24 hours 18MB missing out of 470MB 3.8% data lost
Fourth pass 36 hours 11MB missing out of 470MB 2.3% data lost
97.7% recovered after three and a half days. I tried several more optical drives and also retried drives that I had already used but could only get less than 100Kb more so this appears to be the best we can do with this technique. All of the data is playable, viewable and readable except for some periods of audio and video corruption in the cartoon.
Wow, thanks for such a thorough tutorial and the effort behind it (you ran the program for three and a half days and even damaged a physical medium to recreate the conditions some people might be facing when the necessity to recover data arises).
A question though (and I guess the answer is no): will imaging the disk and then working with that image instead give the same results as working with the actual medium if done for a few days?
Hi,
This is a method I used in the past to recover camcorder disks that failed in the camera. In this case the disk wasn’t physically damaged but managed to get corrupted during the writing process in the camera.
I have also used it to recover scratched disks but as a final stage I try polishing the disk (after recovering as much data as possible 1st) This has managed to recover a lot more data. Obviously, polishing the disk can make it unreadable (which is why it is vital to recover as much as possible first) but quite often this works. If really bad a thin coat of spray laquer on the disk can fill in some of the scratches, nothing ventured – nothing gained.
Brian
Hi Brian
Great tip. I did not mention the lacquer trick because it takes some practice. If anyone reading this tries it I recommend doing it on a practice disc first by scratching it up and then getting a feel for how to apply just enough to fill the cracks. It is definitely a ‘last ditch’ effort when you are about to give up and throw the disc away 🙂
James
This article acveehid exactly what I wanted it to achieve.
An excellent and very useful article.