At first, I had a hard time grasping the purpose and use of the save() and restore() methods of the canvas’ 2d context. It’s really very simple and here are some examples that can help you understand it better.
Let’s look at an official definition of save() and restore()
Each context maintains a stack of drawing states. Drawing states consist of:
* The current transformation matrix.
* The current clipping region.
* The current values of the following attributes: strokeStyle, fillStyle, globalAlpha, lineWidth, lineCap, lineJoin, miterLimit, shadowOffsetX, shadowOffsetY, shadowBlur, shadowColor, globalCompositeOperation, font, textAlign, textBaseline.
The current path and the current bitmap are not part of the drawing state. The current path is persistent, and can only be reset using the beginPath() method. The current bitmap is a property of the canvas, not the context.
context.save() Pushes the current state onto the stack.
context.restore() Pops the top state on the stack, restoring the context to that state.
http://www.whatwg.org/specs/web-apps/current-work/multipage/the-canvas-element.html#the-canvas-state
Since a canvas can only have one 2d context, Save and restore can be used as a solution to a wide variety of situations. One of the most common uses is for transformations.
An example of how save() and restore() help with transformations.
When you perform a transformation, the entire context’s coordinate system is transformed. After transforming, you often want the coordinate system to be back to normal for your next step. Reversing the transformation by using another transformation is a dicey affair and can easily introduce small errors that add up quickly. It’s easier to simply save the normal starting coordinate system as a saved drawing state and then after we do our transformation and wish to have a normal coordinate system as opposed to our newly transformed one, we simply restore the state we saved before transforming. Got it? LOL. Here’s some pictures to make it clearer.
We start with our normal coordinate system and call canvascontext.save() to push a copy of our current drawing state onto our drawing state stack.
Then we transform our context.
Draw our transformed shape on it. canvascontext.fillRect(1,1,2,2)
Now we want to draw more shapes but we don’t want the current transformations to apply so we call restore() and pop the last saved drawing state off of the drawing state stack.
Notice that the shapes did not change, just the drawing state as it applies to future drawing.
Super simple example
Here is a super simple example to illustrate how the drawing state stack works with save() and restore().
First, the source code listing so you can play around with it. This example is coded for readability and not for optimized operation. All you need is a text editor like notepad and an HTML5 friendly browser (I’m using Firefox 3.6).
<!doctype html>
<html>
<head>
<meta charset="UTF-8" />
<title>Canvas Test</title>
</head>
<body>
<header> </header>
<nav> </nav>
<section>

<div>
<canvas id="canvas" width="320" height="200">
This text is displayed if your browser does not support HTML5 Canvas.
</canvas>
</div>

<script type="text/javascript">
var canvas;
var ctx;

function init() {
canvas = document.getElementById("canvas");
ctx = canvas.getContext("2d");
draw();
}


function draw() {

ctx.fillStyle = '#FA6900';
ctx.shadowOffsetX = 5;
ctx.shadowOffsetY = 5;
ctx.shadowBlur    = 4;
ctx.shadowColor   = 'rgba(204, 204, 204, 0.5)';
ctx.fillRect(0,0,15,150);
ctx.save();

ctx.fillStyle = '#E0E4CD';
ctx.shadowOffsetX = 10;
ctx.shadowOffsetY = 10;
ctx.shadowBlur    = 4;
ctx.shadowColor   = 'rgba(204, 204, 204, 0.5)';
ctx.fillRect(30,0,30,150);
ctx.save();

ctx.fillStyle = '#A7DBD7';
ctx.shadowOffsetX = 15;
ctx.shadowOffsetY = 15;
ctx.shadowBlur    = 4;
ctx.shadowColor   = 'rgba(204, 204, 204, 0.5)';
ctx.fillRect(90,0,45,150);
ctx.save();

ctx.restore();
ctx.beginPath();
ctx.arc(185, 75, 22, 0, Math.PI*2, true);
ctx.closePath();
ctx.fill();

ctx.restore();
ctx.beginPath();
ctx.arc(260, 75, 15, 0, Math.PI*2, true);
ctx.closePath();
ctx.fill();

ctx.restore();
ctx.beginPath();
ctx.arc(305, 75, 8, 0, Math.PI*2, true);
ctx.closePath();
ctx.fill();
}

init();
</script>
</section>
<aside> </aside>
<footer> </footer>
</body>
</html>
You can copy this code and paste it into a new file called something like saverestore.html and when you open it with an HTML5 friendly browser like Firefox 3.6 it will display the canvas.
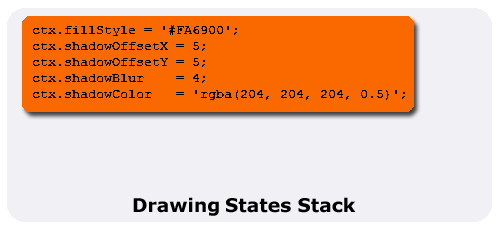
First we draw a rectangle setting the fillStyle and shadow properties for our shape. Then we call ctx.save() which adds our settings to the stack.
    ctx.fillStyle = '#FA6900';
    ctx.shadowOffsetX = 5;
    ctx.shadowOffsetY = 5;
    ctx.shadowBlur    = 4;
    ctx.shadowColor   = 'rgba(204, 204, 204, 0.5)';
    ctx.fillRect(0,0,15,150);
    ctx.save();

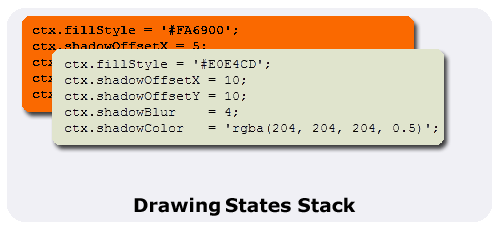
Then we draw another rectangle setting the fillStyle and shadow properties for our shape and call ctx.save() which adds our settings to the stack.
    ctx.fillStyle = '#E0E4CD';
    ctx.shadowOffsetX = 10;
    ctx.shadowOffsetY = 10;
    ctx.shadowBlur    = 4;
    ctx.shadowColor   = 'rgba(204, 204, 204, 0.5)';
    ctx.fillRect(30,0,30,150);
    ctx.save();

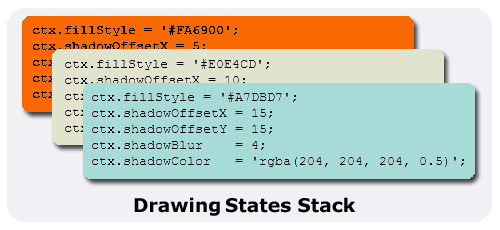
And we draw another rectangle setting the fillStyle and shadow properties for our shape. Then we call ctx.save() which adds our settings to the stack.
    ctx.fillStyle = '#A7DBD7';
    ctx.shadowOffsetX = 15;
    ctx.shadowOffsetY = 15;
    ctx.shadowBlur    = 4;
    ctx.shadowColor   = 'rgba(204, 204, 204, 0.5)';
    ctx.fillRect(90,0,45,150);
    ctx.save();

Now we call ctx.restore() and pop the settings off of the top of our stack and we draw a circle using those settings.
    ctx.restore();
    ctx.beginPath();
    ctx.arc(185, 75, 22, 0, Math.PI*2, true);
    ctx.closePath();
    ctx.fill();

Another call to ctx.restore() pops the next settings off of the top of our stack and we draw a circle using those settings.
    ctx.restore();
    ctx.beginPath();
    ctx.arc(260, 75, 15, 0, Math.PI*2, true);
    ctx.closePath();
    ctx.fill();

And a final call to ctx.restore() pops the next settings off of the top of our stack and we draw a circle using those settings.
    ctx.restore();
    ctx.beginPath();
    ctx.arc(305, 75, 8, 0, Math.PI*2, true);
    ctx.closePath();
    ctx.fill();

If you have any questions or corrections, please leave a comment.
Thanks for your explanations! I was surprised how difficult it was to find out what the save() and restore() do but your explanations are very good.
Whew, thanks. Technical descriptions do a fine job of describing WHAT something does, but you managed to explain WHY I would want to do it, which is very important 🙂
This was an awesome explanation!
Thank you for the explanation. I got it now. Stupid books do not give enough examples like this one.
This is the best explanation I could ever find. I was so much confused by explanations I saw so far but this one make me understand what save and restore is for. 😀
Clear and crispy example . Helped a lot .
Hey James,
great and quick explanation. Exactly what I was looking for.
Thanks!
is it possible to save entire canvas into database and retrieve canvas from database
Thanks for the explanation.
I noticed though… just before you begin drawing the circles, you’re doing a ctx.save() and ctx.restore() back-to-back. I realize that was probably for demo purposes, but that’s an unnecessary step since you would get the same result if you were to draw the cyan Circle immediately after the cyan Rect, correct?
Thanks for this helpful post. Makes more sense now!
Awesome article, thanks a ton ! Nobel prize for you !!!
Really good explanation!
Hi Mr. Litten,
Thankfully I found this explanation! Many thanks for elucidating this point. Very good job Sir.
Regards,
Srinivas
very helpull, thank you so much
Thanks, this was helpful
I am developing an app using phonegap. learning to pick up html5.
I have a canvas and two buttons.
on button 1 click, I do some freehand drawing (using touch events).
on button 2 click, I upload a image on it.
The result should be such that both the image and writing should be displayed.
i tried save and restore
but not getting? pl help
thanks a lot!
thanks
But can we call the saved context out of order in which they are added to the stack?
It would be really helpful if they can be saved with an id or name which would help us recognise each of them individually.
Thanks for a clear explanation, much appreciated!
Thanks! Interesting explanation.
The explanation at Udacity was a bit short, but this really makes it clear, nice example too.