In order to make games using an HTML5 canvas element, you need to be able to detect user input. This post shows how to capture keystrokes on the keyboard and use them to manipulate shapes on the canvas.
This example is coded for readability and not for optimized operation. All you need is a text editor like notepad and an HTML5 friendly browser (I’m using Firefox 3.6).
Here is the code listing that we will be discussing.
<!doctype html>
<html>
<head>
<meta charset="UTF-8" />
<title>Canvas Test</title>
</head>
<body>
<section>

<div>
<canvas id="canvas" width="300" height="200">
This text is displayed if your browser does not support HTML5 Canvas.
</canvas>
</div>

<script type="text/javascript">
var canvas;
var ctx;
var dx = 5;
var dy = 5;
var x = 150;
var y = 100;
var WIDTH = 300;
var HEIGHT = 200;

function circle(x,y,r) {
ctx.beginPath();
ctx.arc(x, y, r, 0, Math.PI*2, true);
ctx.fill();
}

function rect(x,y,w,h) {
ctx.beginPath();
ctx.rect(x,y,w,h);
ctx.closePath();
ctx.fill();
ctx.stroke();
}

function clear() {
ctx.clearRect(0, 0, WIDTH, HEIGHT);
}

function init() {
canvas = document.getElementById("canvas");
ctx = canvas.getContext("2d");
return setInterval(draw, 10);
}

function doKeyDown(evt){
switch (evt.keyCode) {
case 38:  /* Up arrow was pressed */
if (y - dy > 0){
y -= dy;
}
break;
case 40:  /* Down arrow was pressed */
if (y + dy < HEIGHT){
y += dy;
}
break;
case 37:  /* Left arrow was pressed */
if (x - dx > 0){
x -= dx;
}
break;
case 39:  /* Right arrow was pressed */
if (x + dx < WIDTH){
x += dx;
}
break;
}
}

function draw() {
clear();
ctx.fillStyle = "white";
ctx.strokeStyle = "black";
rect(0,0,WIDTH,HEIGHT);
ctx.fillStyle = "purple";
circle(x, y, 10);
}

init();
window.addEventListener('keydown',doKeyDown,true);
</script>
</section>
</body>
</html>
You can copy this code and paste it into a new file called something like keycanvas.html and when you open it with an HTML5 friendly browser like Firefox 3.6 it will display the a canvas with a circle on it that you can move with the arrow keys on your keyboard.
First we add our canvas.
<canvas id="canvas" width="300" height="200">
This text is displayed if your browser does not support HTML5 Canvas.
</canvas>
To draw on our canvas we need to get a javascript reference to the canvas element. We do this in our init() function which is the function that we call to start everything.
function init() {
  canvas = document.getElementById("canvas");
  ctx = canvas.getContext("2d");
  return setInterval(draw, 10);
}
First we get the element ID from the DOM for the canvas element with the id = “canvas” and then we get an object in the form of a context of our canvas allowing us to do stuff with it in javascript.
  canvas = document.getElementById("canvas");
  ctx = canvas.getContext("2d");
The context is “2d”
The “2d” context interface can be found here. http://dev.w3.org/html5/canvas-api/canvas-2d-api.html#canvasrenderingcontext2d
This context contains the basic methods for drawing on the canvas such as arc(), lineto() and fill().
The next line uses setInterval(function, time) to call the draw() function every 10 milliseconds. The setInterval() method calls a function or evaluates an expression at specified intervals (in milliseconds).
The draw() function is the heart of our script and it beats once every 10 milliseconds thanks to the setInterval() method.
function draw() {
  clear();
  ctx.fillStyle = "white";
  ctx.strokeStyle = "black";
  rect(0,0,WIDTH,HEIGHT);
  ctx.fillStyle = "purple";
  circle(x, y, 10);
}
First we call our clear() function which uses the clearRect() method to erase everything in a rectangle that is the same size as the canvas. Two opposite corners of the rectangle to be cleared are set as (0,0) and (WIDTH, HEIGHT). The WIDTH and HEIGHT have the same value as the width an height of the canvas.
function clear() {
  ctx.clearRect(0, 0, WIDTH, HEIGHT);
}
After we clear the canvas the fillStyle and strokeStyle for the context is set to the colors that we want the canvas background and border to be.
  ctx.fillStyle = "white";
  ctx.strokeStyle = "black";
Next we create a rectangle that is the same size as the canvas using our rect() function.
function rect(x,y,w,h) {
  ctx.beginPath();
  ctx.rect(x,y,w,h);
  ctx.closePath();
  ctx.fill();
  ctx.stroke();
}
The fill method fills the rectangle with the color we defined in the fillStyle attribute. The stroke method draws a border around the rectangle with the color defined in the strokeStyle attribute
Now back in the draw() function we change the fillStyle attribute to the color that we want our circle to be.
ctx.fillStyle = "purple";
To create our circle we will make a circle() function.
function circle(x,y,r) {
  ctx.beginPath();
  ctx.arc(x, y, r, 0, Math.PI*2, true);
  ctx.fill();
}
The beginpath() method makes sure that we are starting a new path.
Next we use the arc(x, y, radius, startAngle, endAngle, anticlockwise) method to define the size and shape of our circle.
Next we use the fill() method which fills our circle with the color defined by the value of the fillstyle attribute of the context object.
Our circle is defined by
circle(x, y, 10);It has a radius of 10 and its origin is at (x,y). To move the circle, we just need to change x and y. The variables dx and dy determine how much to change x and y by each time we press an arrow key on the keyboard.
To detect when someone presses a key on the keyboard we add a javascript listener to listen for keydown events using the addEventListener() method.
addEventListener is defined as
“addEventListener registers a single event listener on a single target. The event target may be a single node in a document, the document itself, a window, or an XMLHttpRequest.
target.addEventListener(type, listener, useCapture);
type
A string representing the event type to listen for.
listener
The object that receives a notification when an event of the specified type occurs. This must be an object implementing the EventListener interface, or simply a JavaScript function.
useCapture
If true, useCapture indicates that the user wishes to initiate capture. After initiating capture, all events of the specified type will be dispatched to the registered listener before being dispatched to any EventTargets beneath it in the DOM tree. Events which are bubbling upward through the tree will not trigger a listener designated to use capture. See DOM Level 3 Events for a detailed explanation.”
https://developer.mozilla.org/en/DOM/element.addEventListener
In our example, we attach the listener to the window. The type is ‘keydown’ which occurs whenever a key on the keyboard is pressed down. The listener is the doKeyDown() function and useCapture is true.
window.addEventListener('keydown',doKeyDown,true);
When a key on the keyboard is pressed down, the doKeyDown() function is executed.
function doKeyDown(evt){
  switch (evt.keyCode) {
    case 38:  /* Up arrow was pressed */
  		if (y - dy > 0){
        y -= dy;
      }
      break;
    case 40:  /* Down arrow was pressed */
  		if (y + dy < HEIGHT){
        y += dy;
      }
      break;
    case 37:  /* Left arrow was pressed */
  		if (x - dx > 0){
        x -= dx;
      }
      break;
    case 39:  /* Right arrow was pressed */
  		if (x + dx < WIDTH){
        x += dx;
      }
      break;
  }
}
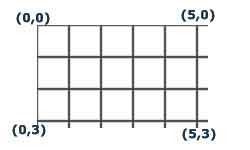
Before we look at what happens when the up arrow is pressed, we need to understand how to plot points onto a canvas element.
The x axis starts at 0 on the left and increases as you move to the right and the y axis starts at 0 at the top and increases as you move down.
In order to move up we need to decrease our y value. We don't want our shape to move completely off of the canvas so we do not let y become less than zero.
    case 38:  /* Up arrow was pressed */
  		if (y - dy > 0){
        y -= dy;
      }
      break;
38 is the keycode that is captured when the up arrow is pressed.(here is a list of keycodes http://www.aspdotnetfaq.com/Faq/What-is-the-list-of-KeyCodes-for-JavaScript-KeyDown-KeyPress-and-KeyUp-events.aspx) Then we make sure that y - dy is not less than 0. If not, then we make y equal to y - dy. The next time the draw function is called, the circle is drawn at the new y coordinate. Since we only want one keypress at a time, we then break out of the doKeyDown() function.
Here is our canvas in action. Since this post is longer than one page, pushing the arrow keys will scroll the page in addition to moving the circle around. I substituted the arrow key keycodes with new keycodes.
Press w to move up (keycode 87)
Press s to move down (keycode 83)
Press a to move left (keycode 65)
Press d to move right (keycode 68)
Changing the canvas with keyboard input is an excellent first step to creating the next big 'casual' game. These techniques can be used on many of the new smartphones but the keycodes are often different for those devices. Otherwise, the rest is the same.
to make movement smoother and to add moving in multiple directions, try this:
(excuse me if this doesn’t show up correctly, I don’t see a “preview comment” box)
//instead of doKeyDown function in original, i added

//an array and three functions:

  //key mgmt

  var keys = new Array();

  function doKeyDown(evt){

    keys[evt.keyCode] = true;

  }

  function doKeyUp(evt){

    keys[evt.keyCode] = false;

  }

  function move(){

    if (38 in keys && keys[38]){  //up

        y -= dy;

    }

    if (40 in keys && keys[40]){  //down

        y += dy;

    }

    if (37 in keys && keys[37]){  //left

        x -= dx;

    }

    if (39 in keys && keys[39]){  //right

        x += dx;

    }

  }

//...
//i rearranged function "draw":
function draw() {
//movement, other between frame logic
move();
//stage maintenence
clear();
ctx.fillStyle = "white";
ctx.strokeStyle = "black";
rect(0,0,WIDTH,HEIGHT);
//draw actor
ctx.fillStyle = "purple";
circle(x, y, 10);
}
//...
//at the end, i added an additional listener:
init();
window.addEventListener('keydown',doKeyDown,true);
window.addEventListener('keyup',doKeyUp,true);
hope you and/or your readers find this useful!
nice it helps me alot
Excellent and well explained, from scratch to complete code build, thanks for taking the time to share
The call to setInterval(draw,10) produces repeated drawing; omitting it seems not to affect anything.
Nice guidance on getting keyboard input
Very nicely explained I’m well impressed. How about if I want to draw on the same Canvas, is this possible ?
I needed to put you that very little remark to help give thanks over again for all the incredible techniques you’ve provided at this time. This is simply tremendously generous with you to provide freely all a few individuals might have offered as an e book to get some bucks for themselves, most importantly considering that you might well have tried it if you wanted. Those advice in addition served like a good way to comprehend other individuals have similar interest just as my own to figure out a great deal more with respect to this condition. I think there are several more pleasant sessions up front for individuals that discover your website.