In this example we will look at slicing images with the drawImage() method of a 2d canvas context. We’ll use two images that are larger than the canvas to create a parallax scrolling effect that is common in 2d games and also another image as a spritemap consisting of three sprites to show how to slice out and draw individual sprites.
I made this example as simple as possible to keep from cluttering up the key concepts of slicing and drawing pieces of images on the canvas. It only moves in one direction by pressing the right arrow key on your keyboard.
Contents
What you need to run this
- An HTML5 friendly browser. I use Google Chrome and Firefox 3.6 .
- A text editor like Notepad. I use PSPad
- Right click and save the three images below to the same directory that you put your HTML page in.
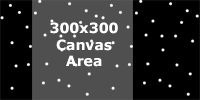
This looks empty but it is white stars on a transparent background so right click and you can save it.

sky.png

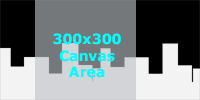
city.png
![]()
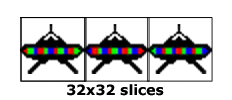
ufo.png
Here’s the canvas (you need an HTML5 friendly browser to view this)
Press the right arrow key on your keyboard to move the spaceship. We only have it coded for one key to keep it simple. Once you understand how it works, it is easy to add movement in other directions.
Here's the code
<!doctype html>
<html>
<head>
<meta charset="UTF-8" />
<title>Canvas Test</title>
</head>
<body>
<section>

<div>
<canvas id="canvas" width="300" height="300">
This text is displayed if your browser does not support HTML5 Canvas.
</canvas>
</div>

<script type="text/javascript">
var canvas;             // Canvas object
var ctx;                // 2d Context object
var WIDTH = 300;        // Canvas width
var HEIGHT = 300;       // Canvas height
var sky = new Image();  // Sky image
var skydx = 2;          // Amount to move sky image
var skyx = 0;           // x coord to slice sky image
var city = new Image(); // City image
var citydx = 5;         // Amount to move city image
var cityx = 0;          // x coord to slice city image
var ufo = new Image();  // UFO image
var ufox = 150;         // x coord of UFO image
var ufoy = 250;         // y coord of UFO image
var ufosprite = 0;      // x coord to slice UFO image

function rect(x,y,w,h) {
ctx.beginPath();
ctx.rect(x,y,w,h);
ctx.closePath();
ctx.fill();
ctx.stroke();
}

function clear() {
ctx.clearRect(0, 0, WIDTH, HEIGHT);
}

function init() {
canvas = document.getElementById("canvas");
ctx = canvas.getContext("2d");
sky.src = "sky.png";
city.src ="city.png";
ufo.src ="ufo.png";
return setInterval(draw, 10);
}

function doKeyDown(evt){
switch (evt.keyCode) {
case 39:  /* Right arrow was pressed */
if ((skyx + skydx) < (300 - skydx)){
skyx += skydx; }
else {
skyx = 0;
}
if ((cityx + citydx) < (300 - citydx)){
cityx += citydx; }
else {
cityx = 0;
}
if (ufosprite < 64){
ufosprite += 32; }
else {
ufosprite = 0 ;
}
}
}

function draw() {
clear();
ctx.fillStyle = "black";
rect(0,0,WIDTH,HEIGHT);
ctx.drawImage(sky, skyx, 0, 300, 300, 0, 0, 300, 300);
ctx.drawImage(city, cityx, 0, 300, 300, 0, 0, 300, 300);
ctx.drawImage(ufo, ufosprite, 0, 32, 32, ufox, ufoy, 32, 32);
}

init();
window.addEventListener('keydown',doKeyDown,true);
</script>
</section>
</body>
</html>
You can copy this code and paste it into a new file called something like slices.html and save it in the same directory with your 3 images for the sky, city and UFO (they must be in the same directory). When you open it with an HTML5 friendly browser like Firefox 3.6 it will display the canvas.
Making the images
I spent maybe a half an hour making these images in Photoshop. They are very simple to illustrate the key concepts of this example. Given a few hours, an artist could really jazz these images up and make them look like a real video game.
The sky background
This image is two identical 300x300 images attached horizontally to make a single 600x300 image that we will move across the canvas by selecting 300X300 slices of it. Once we get to the end of the image (moving right) we reset the image back to the beginning which is the same because the leftmost 300x300 slice is identical to the rightmost 300x300 slice.

The city background
The city background is the same size as the sky background and is moved in the same manner of 300x300 slices. By putting it on top of the sky image and scrolling it slightly faster than the sky image we create the parallax scrolling effect.

Spaceship spritemap
The spritemap consists of three 32x32 images each a slightly modified version of the spaceship (different color lights). We display the spaceship one 32x32 slice at a time to create the magical illusion of animation.

Slicing and moving the images
We have an event listener listening for keypresses on the keyboard.
window.addEventListener('keydown',doKeyDown,true);
When a key is pressed it calls doKeyDown() and checks to see if the right arrow key was pressed. If it was it sets the variables for slicing our images.
function doKeyDown(evt){
  switch (evt.keyCode) {
    case 39:  /* Right arrow was pressed */
      if ((skyx + skydx) < (300 - skydx)){
        skyx += skydx; }
      else {
        skyx = 0;
      }
      if ((cityx + citydx) < (300 - citydx)){
        cityx += citydx; }
      else {
        cityx = 0;
      }
      if (ufosprite < 64){
        ufosprite += 32; }
      else {
        ufosprite = 0 ;
      }
  }
}
First we check if our sky background slice is at the right end of the image and if it is, we set it back to skyx = 0 which is the leftmost slice. If not then we increment it by skydx which is the amount that we move the sky for each keypress (must be lower than citydx to achieve the parallax effect).
Then we do the same for our city background.
Next we increment our slicing variable for the UFO to slice the next 32x32 sprite out of our UFO spritemap image.
Now that we have our variables set to new values, let's go to our draw() function (which runs every 10 milliseconds) and clear the canvas and redraw everything with our new values.
function draw() {
  clear();
  ctx.fillStyle = "black";
  rect(0,0,WIDTH,HEIGHT);
  ctx.drawImage(sky, skyx, 0, 300, 300, 0, 0, 300, 300);
  ctx.drawImage(city, cityx, 0, 300, 300, 0, 0, 300, 300);
  ctx.drawImage(ufo, ufosprite, 0, 32, 32, ufox, ufoy, 32, 32);
}
First we clear the canvas and paint it black so our white stars will show.
  clear();
  ctx.fillStyle = "black";
  rect(0,0,WIDTH,HEIGHT);
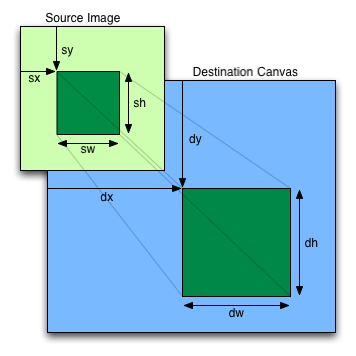
Next we meet the wonderful drawImage() function. Here is the syntax and a picture from the W3C (http://dev.w3.org/html5/2dcontext/#images). I can't say it any clearer.
context . drawImage(image, dx, dy)
context . drawImage(image, dx, dy, dw, dh)
context . drawImage(image, sx, sy, sw, sh, dx, dy, dw, dh)Draws the given image onto the canvas. The arguments are interpreted as follows:

In the city and sky backgrounds the only variable that we change is the sx coordinate of where our slice begins. The slices are always 300x300 and are always drawn at (0,0) on our canvas.
  ctx.drawImage(sky, skyx, 0, 300, 300, 0, 0, 300, 300);
  ctx.drawImage(city, cityx, 0, 300, 300, 0, 0, 300, 300);
The spaceship also only changes the sx coordinate to slice the 32x32 sprite that we want to draw and is positioned on the canvas by ufox and ufoy which are always (150,250).
ctx.drawImage(ufo, ufosprite, 0, 32, 32, ufox, ufoy, 32, 32);
Where to go from here
You can now jazz up your canvas. Here are some suggestions.
Add movement in more directions.
Make better graphics.
Have the UFO shoot lasers or flames or peanut butter.
Have fun with the code as that is the easiest way to learn.
If you have a question that you do not want published as a public comment, then use my contact page.
Thanks for a great tutorial.
I’m looking at ways to speed up a similar parallax canvas by storing the images in local storage and then drawing them on the canvas (rather than loading them from the Web Server).
Any experience doing something like this? Is it a waste of time because it’s just duplicating browser cache?