XP Won’t Boot 🙁
Repair Series Part 1: POST and MBR Issues
DISCLAIMER: These examples use techniques that I actually employ in the real world to deal with real problems. They might be wrong or dangerous. They might be inefficient. If you try them yourself, it might cause damage or irreparable loss. I take no responsibility for anything you do based on my examples or the information that I provide here.
Turning on your computer and having it not start is one of the worst experiences computer users can have. It is often mysterious and you are given little information as to what is wrong. Usually a cryptic blue screen error, a one line error like “Operating System Missing” or nothing at all. Just a blank screen that never does anything or just keeps restarting on its own in an endless loop. Every week I fix unbootable XP computers.
Even though the XP operating system has been off the market for years, it is still almost as common for me to repair as Windows 7 computers.
A lot of times when I do remote repairs (by phone, email or my private discussion board) the user does not have an XP disc and this complicates things further for them. Many laptops never came with an XP disc and often the user hasn’t needed the disc for years and if they had one, they have no idea where it may be stored.
Here are the errors I see most often and some tips on how to repair them.
We will be looking at Windows XP 32-bit using NTFS for the filesystem.
When you turn on the computer, its CPU begins to carry out the programming instructions contained in the basic input/output system (BIOS). The BIOS contains the code that starts the computer regardless of the operating system installed. The first set of startup instructions is the Power On Self Test (POST). The POST gets the computer ready for loading the operating system.
Power On Self Test (POST)
Performs initial hardware checks, such as determining the amount of memory present
Verifies that the devices needed to start an operating system, such as a hard disk, are present
Retrieves system configuration settings from nonvolatile memory, which is located on the motherboard
After the motherboard POST completes, add-on adapters that have their own firmware (for example, video and hard drive controllers) carry out internal diagnostic tests.
Here we encounter our first common error. These are some of the variations of the text for this error…
- Hard disk absent
- Hard disk failed
- Hard disk missing
- Hard disk not found
- Hard disk error
The following can also be an MBR error but first you need to make sure that the BIOS is seeing the hard drive correctly…
- No Bootable Device Available
- No Bootable Devices Found
- Boot Device Not Found
- Error Insert proper boot device
- Reboot and select proper boot device error
Troubleshooting
Important safety tips.
When disconnecting or checking the hard drive connections, always make sure the computer is unplugged and has no power (hold down the power button for a few moments to drain any stored power after unplugging). Also, you should be grounded with a wrist strap or take other precautions not to shock anything with static electricity.
Check the BIOS settings
Start the computer and go into the BIOS settings. There should be instructions for how to do this as soon as the computer starts. Like, “Press F2 to enter system settings“.
In the BIOS look and see if your hard drive is listed. If it is not, then we need to find out why. If it is listed then make sure that it is also listed as a boot device in the Boot Order section of the BIOS (search online for a manual that is specific to your model for the exact settings location in your BIOS).
If everything looks okay in the BIOS then see if your computer has built in diagnostics. Many brand name computers like Dell, HP and Compaq do. Consult the manual for your computer for details.
If it passes the diagnostics then move on to checking the MBR later in this post.
If you find a problem in the BIOS then you need to check the physical connections of the hard drive.
Desktop Computer
Unplug the power cable and hold down the power button for a few moments to drain any stored power after unplugging.
IDE Drives
I have seen the ribbon cable go bad on many IDE hard drives. The easist way to check it is to replace it with a new one or one that you know is good.
Check that the power MOLEX connector is plugged into the drive tightly.
Check that the ribbon cable is properly seated in the Primary IDE socket on the motherboard.
Check that the ribbon cable is properly seated in the socket on the hard drive.
Make sure that the jumpers are set properly so that the boot drive is set as the Primary Master and anything else connected to the cable is set to Primary Slave.
Or
If using Cable Select, make sure the jumpers on the drive are set correctly and that the boot drive is plugged into the Master plug on the ribbon cable (the end plug on an 80 conductor cable or the middle plug on a 40 conductor cable).
Check the BIOS again to see if the drive is now properly detected.
SATA Drives
Check that the power and data cables are properly seated in the drive and motherboard.
Check the BIOS settings, particularly ones that look like these (consult your manual for the proper settings)…
SATA RAID / AHCI Mode
SATA Port Native Mode
Onboard SATA/IDE Crtl Mode
Check the BIOS again to see if the drive is now properly detected.
Laptop Drives
Unplug the power cable, and remove the battery first before removing the Hard Drive.
Remove any thing else plugged into the laptop.
Pull out the hard drive and carefully reseat it.
Check the BIOS again to see if the drive is now properly detected.
If you still get the error at this point, it is probably a serious problem with the drive itself. See if it is detected in a different computer. You can see some of my other blog posts on data recovery for instructions on doing this.
After the POST
When you start a computer from the hard drive, the BIOS identifies the startup drive and reads the master boot record (MBR). The MBR is always located at the first sector so the BIOS can find it. It contains a small program called the master boot code that the BIOS loads into memory and begins to run.
The master boot code runs and performs the following activities
Scans the partition table for the active partition.
Finds the starting sector of the active partition.
Loads a copy of the boot sector from the active partition into memory.
Transfers control to the executable code in the boot sector.
The partition table makes up the rest of the MBR and defines the size and type of the partitions which you usually see as drives in Windows like C: D: etc…
If the first hard drive on the system does not contain an active partition, the partition table is corrupted or if the master boot code cannot locate the boot sector of the system volume from the partition table, the MBR displays messages similar to the following:
- Invalid partition table.
- Error loading operating system.
- Missing operating system.
- No Bootable Devices Found
- Reboot and select proper boot device error
The master boot code is often the same on XP systems but the partition table is changed based on the specifics of your setup. It is also often changed by malware.
An excellent description of the XP MBR can be found here…
http://thestarman.pcministry.com/asm/mbr/Win2kmbr.htm
Repairing the MBR from XP Recovery Console
To run the Recovery Console, you will need the Windows XP CD. Solutions for running the Recovery Console without the CD or if you have lost or are unable to get it to accept the administrator password are covered in…
Part 4: Recovery Console and Other Tools (Coming Soon)
Boot your computer from the Windows XP CD (see the manual for your computer for instructions on booting from a CD)
When the ‘Welcome to Setup’ screen appears, press the R button on your keyboard to start the Recovery Console.
The Recovery Console will start. If you have multiple Windows installations, it will list them, and you enter the number associated with the installation you want to work on and press enter. If you have just one Windows installation, type 1 and press enter.
You will then be prompted for the Administrator’s password. If there is no password, press enter. Otherwise type in the password and then press enter.
You will now see a
C:\Windows>prompt and you can start using the Recovery Console.
You can attempt to repair the MBR with the fixmbr command.
http://www.microsoft.com/resources/documentation/windows/xp/all/proddocs/en-us/bootcons_fixmbr.mspx?mfr=true
NOTE: Some rootkits can cause fixmbr to think it worked even though it did not. I always look at the MBR partition table before running fixmbr. Gparted (described further below) makes this easy to do.
If you are attempting to repair the default boot drive, you can type
fixmbr
and hit enter.
You may see a warning like this…
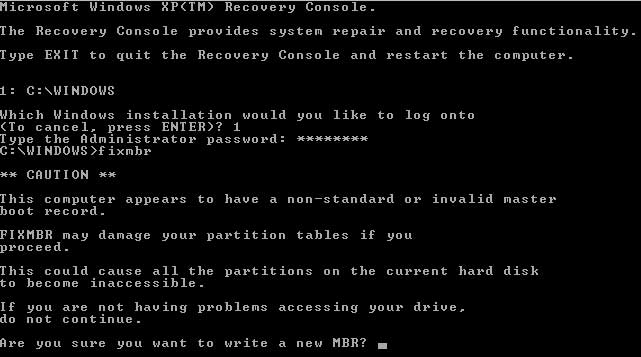
If you type y then it will quickly write a new MBR to the drive.
Now remove the CD and type
exit
and hit enter to reboot the computer and see if it is fixed.
If this does not fix it there may be deeper problems with the MBR or the problem may be further in the boot process.
How to look at your Partitions and MBR (even if your computer doesn’t boot)
If your computer sees the hard drive but still does not boot, we can take a look at the MBR using a bootdisk or bootable USB (if the computer has USB booting capabilities).
Lately, I’ve preferred PartedMagic for this. It is free but be sure to donate to him if his product helps you.
http://partedmagic.com/
Follow the directions there to make a boot CD.
Boot your broken computer from the CD and Select
1. Default Settings (Runs from RAM)
Lets take this opportunity to look at the built-in Self-Monitoring, Analysis and Reporting Technology (SMART) diagnostic report of the hard drive.
After PartedMagic loads, double-click the Disk Health icon on the desktop and then double-click the icon for your hard drive and select the Attributes tab.
I usually look for bad sectors “Reallocated Sector Count” represented by the raw value of attribute ID 5 (and C5 to a lesser extent).
If this value is greater than 0 you may want to click on the Perform Tests tab and run the “Short Self Test” to make sure that it runs with a test result of “Completed without error”. If you see problems here, then the drive is probably going bad and you should focus on data recovery and replace it.
Next we can use the Partition Editor program in Parted Magic called GParted to see if the partitions are showing up properly.
Double click the Partition Editor icon on the desktop and select /dev/sda
Make sure that one of the partitions has ‘boot‘ in the FLAGS column.
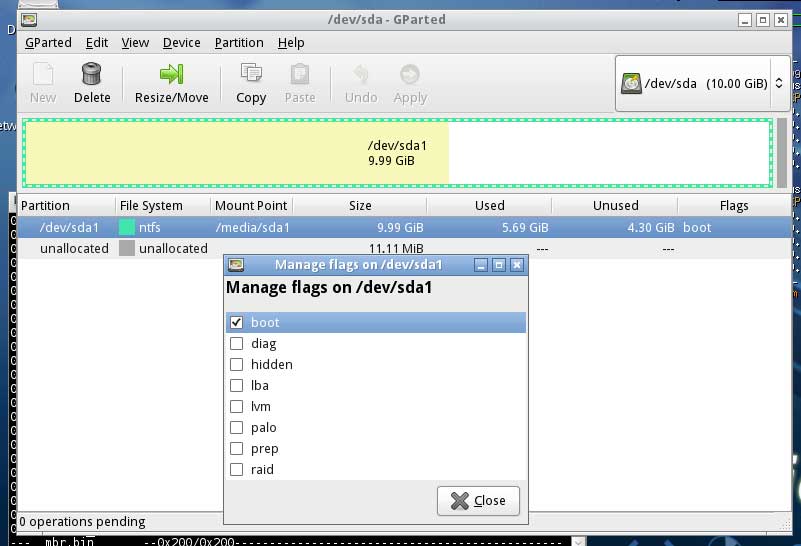
If not, choose the partition that you want to boot from and right-click it, select Manage Flags and check the box for the Boot flag. Then click the Apply button, remove the CD and reboot to see if that fixed it.
If you see anything strange here like tiny hidden bootable partitions, you should consult with a professional as this could be malware. Changing the Boot flag on partitions is relatively easy to undo but deleting a partition may make things worse.
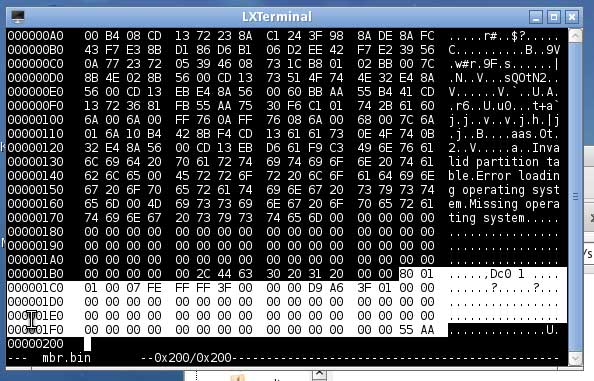
If you don’t see any partitions on your hard drive listed in the Partition Editor then you can look at the hex of your MBR at the partition table and see if something looks wrong there.
In PartedMagic there is a button in the lower left corner of the screen that functions much like the START button on a Windows XP desktop so I’ll refer to it here as the START button.
Open LXTerminal, [b]START>ACCESSORIES>LXTerminal[/b]
Type
dd if=/dev/sda of=/media/sda1/mbr.bin bs=512 count=1
and press enter.
To view the MBR type
hexedit
and press enter.
For a filename enter
/media/sda1/mbr.bin
Here is a screenshot showing the partition table data section highlighted (and the Magic number or MBR signature 55 AA or 0xaa55 which all MBRs must have).
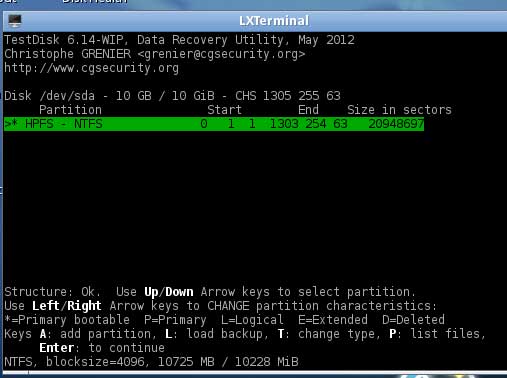
Partition Table Recovery/Repair with TestDisk
For this section lets look at an MBR with a messed up partition table. This is from the same drive as the previous picture but I’ve deleted the partition.
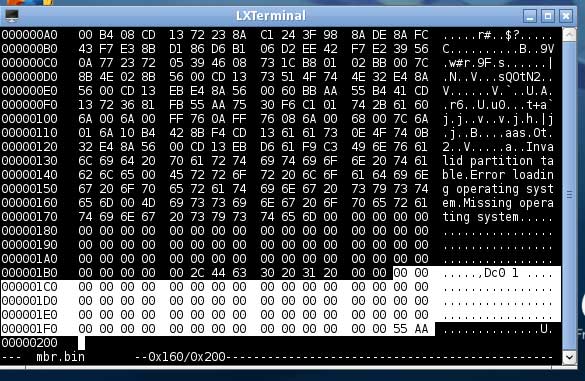
When we try to boot from this drive, we get the error…
Boot device not found.
Lets boot into PartedMagic again and open LXTerminal and type
Testdisk
Choose No Log (since we have no disk to write to)
Select our drive
Here it will tell you if there is an error detected for the disk.
Select Intel
Select Analyse
Here it will often tell you errors with the partitions (like invalid sector counts) or show bizarre partitions that may be overlapping or corrupted in the partition table.
Select Quick Search
Say No to question about Vista
It finds our bootable partition
Press enter and then choose Write and confirm that you want to write the new partition table to the MBR
Now reboot and the system comes back like before the partition was deleted.
This also works for damaged or corrupted partition tables.
More details on using TestDisk to repair partitions can be found here
http://www.cgsecurity.org/wiki/TestDisk_Step_By_Step
If you’ve gotten this far and still haven’t found the reason why your computer does not boot, then we will move on to the next step in XP’s boot process. The Bootloader to Logon. Go to Part 2 for that post.
Part 2: Bootloader to Logon Issues
Part 4: Recovery Console and Other Tools
ALL COMMENTS ARE MODERATED TO PREVENT SPAM
Thank you for a wonderful tutorial that actually works, I was able to revive a system for a client that had MBR 3 error and after a ton of efforts my last resort was to wipe the system and reinstall but your metthod saved the day.
Thank you and more power to you.
Thanks for a great tutorial. I did find that partedmagic is now requiring a payment of $4.99 to download it. I have absolutely no problem as I come from the 1980s shareware environment, and this way people will pay what I consider to be a nominal sum to support someone’s work!
Hi Rick
Thanks for the kind words.
PartedMagic stopped being free back in September but the response in the FOSS community (like you) has been mostly understanding of the reasons behind it. Lately, when a free version of the tools is required by someone who is not comfortable with Linux, I’ve been recommending the CloneZilla LiveCD which has TestDisk and ddrescue in it if you choose the command line when starting it. And the GParted liveCD for using GParted.
I certainly would prefer people to support PartedMagic though as it is the best way for Linux novices to have access to the tools that I recommend.
James
Salve. I apologize for bothering you .
Briefly. I read your web pages but I could not find a solution to the problem of my laptop (assuming that there might be!)
Start with the computer windows xp SP3 but I read that there is no OS and the BIOS does not see the hdd (1).
I tried to replace hdd (1) with the other hdd (2) definitely working and the bios sees it, then all connections are good.
The hdd (1) works because I hear the sound of the engine and the click of the head that moves, all this for 20-40 seconds and then stops by itself .
This fault is after I removed the program Glaryutilities but I think I deleted something too: probably the MBR file: neither possible that this is the reason of this problem ?
I connected hdd (1) externally to another computer via the USB port, but there is always the same defect: the computer does not see it and the HDD (1) motor runs for 20-40 seconds then stops.
I have some data on the HDD (1) and I do not want to erase with the formatting and then the question is: how can I restore the MBR file, or other files required to restart the hdd (1) and retrieve them?
Thank you in advance and I cordially greet .
happy First
Hi Felice
It sounds like the hard drive has physical damage. It should be sent to a data recovery lab for recovery.
James
Hi, My friend has asked me to have a look at his Panasonic CF-18, I fixed most of the problems, then went in to do a checkdisk, this took a long time and the computer froze. I restarted the computer and get the test screen with F2/F10 then it goes blank with a disk read error occurred
Press Ctrl+Alt+Del to restart, same happens. His computer is xp and does not have a floppy of Cd drive so only way of fixing is with a usb stick
Regards
John
Hi,
I had Windows 7 64bit and LMDE in my HD but I needed a 32bit OS for a midi patchbay so i installed Win7 32bit only to find out that the patchbay will not work so i installed XP to the partition that previously had the win7 32bit.So XP overwritten the MBR and made itself the only bootable option(automatic too).I downloaded EasyBCD and added the XP entry and made it the default OS (don’t know why but i did)and also deleted the previous Win7 32bit entry(which shouldn’t be there?!)
Okay,probably i messed up completely because the computer will not boot.I inserted a usb stick with a win7 32 iso and tried to repair my startup.It finds the Win7 64 installation but can’t do any more.Should i proceed with the fixboot etc. from the command prompt or make another usb with a Win7 64 iso.?
Thank you for your time:)
Hi this is really a great tutorial and I have tried using testdisk for many times on several external drive, however, this time I accidentally rewrite the MBR on the system drive itself that result to my computer unable to its OS. however can i fix this issue, is there another I can use to boot and have the boot loader be fix? Thanks in advance.
-Nathan
*edited – sorry for the confusion 😀
Hi this is really a great tutorial and I have tried using testdisk for many times on several external drive, however, this time I accidentally rewrite the MBR on the system drive itself that result to my computer unable to boot to its OS. Is there a way I can fix this issue, is there another tool I can use to boot and have the boot loader be fix? Thanks in advance.
useful information. It’s the best
RAW
lengthy and in depth article but full of useful information
My XP Professional, SP3, does not boot. I took it to a local shop and they could not fix it. If I install the drive in an external case, I can access all of the files on both the “C”and”D” partitions. I have tried the MBR fix and several other documented “standard MS” recovery
without success. I do not know where to go from hear? Willing to hex edit files. Need a little direction and possibly some instructions.
Thanks.
Hi Bryan
Sounds like you may be at the point where a reinstall is in order. This may help…
http://support.microsoft.com/kb/978788
Be sure to backup important data first.
Hope this helps,
James
where is it avialable in bois for first boot hidden boot
error
: windows no has found only 504 k of low memory. 512 k of low memory is required to run window nt. you may need to upgrade your computer or run a configuratio jnprogram provided by the manufacturer.
Thanks for a well done tutorial. I ran across it after having done much of what you talked about on a drive where the the MBR got clobbered. I too am using the PartedMagic tool (same version shown in your tutorial). However using Testdisk to either copy the Backup Boot Sector over the boot sector, or to Rebuild the Boot Sector, and then write it to disk I get a Testdisk message saying “Write error: Can’t overwrite NTFS boot sector”. When I dump the boot sector it is all nulls, where the backup one loos normal. I can see & read all the other data in the NTFS partition, but without a good boot sector I can’t boot the drive. Is there a way to get the Boot Sector straightened out?
Hi Jim
Thanks for the kind words.
Typically, that error is a sign of damage to the file system.
If you can see your data in TestDisk or some other way then make a copy of it first.
If it is only visible in TestDisk then…
Go to the screen in TestDisk where you see your files and folders and follow the steps in this comment…
http://html5.litten.com/updated-how-to-fix-external-disk-drive-suddenly-became-raw/#comment-165809
You will need to have enough space on another disk to copy them to.
Once you’ve copied the important data, see if you can run chkdsk on the drive which may fix it or at least fix it enough for you to be able to repair the boot sector.
Did you check the S.M.A.R.T. data of the drive? Maybe there are some bad sectors causing the problems.
You can find some instructions in the section titled…
Accessing and Assessing a Hard Drive’s S.M.A.R.T. Data to Determine if There is Physical Damage
on this post…
https://html5.litten.com/updated-how-to-fix-external-disk-drive-suddenly-became-raw/
Hope this helps
James
Thanks. I also ran the Spinwrite (level 5) utility twice on the the disk, and both times it reported no surface errors (I don’t often see one that clean). Spinwrite attempts to read the S.M.A R.T. Data, but reported the disk did not provide S.M.A.R.T. data, so it couldn’t evaluate it. Since Spinwrite read & writes every byte on the disk, inverting the bit pattern on one of the read/write passes (I presume that includes the bytes in the boot sector too), it makes it difficult to understand why Testdisk doesn’t seem to be able to write to the boot sector. I’ve already copied data file off to another system, so the data is mostly safe now. Guess I’ll have to find another disk to to have Testdisk backup everything, and see if I can rebuild the disk and restore the partition data from the backup, unless you’ve got other ideas. I have some old software i need to access on that disk, which is not supported on today’s Windows 10 systems, and I’m not sure I can still find the installation media to reinstall it, so I’d really like to repair this disk.
Hi Jim
Sometimes I have good luck with HDDScan http://www.hddscan.com when other tools can not see the S.M.A R.T. Data. From what you’ve seen so far I think it would be very helpful to get a look at that data before using the disk for anything else.
Hope this helps,
James
Will give hddscan a look. Based on what I see in the Disk Health utility, I’d interpret what I see in Spinwrite as there is nothing that had produced a S.M.A.R.T. alert and not that the disk can’t report those alerts if needed. Agreed, I won’t be using the disk for anything else at this point, until I can image it to another drive (just need a suitable drive now).