Accessing and Assessing a Hard Drive’s S.M.A.R.T. Data
DISCLAIMER: These examples use techniques that I actually employ in the real world to deal with real problems. They might be wrong or dangerous. They might be inefficient. If you try them yourself, it might cause damage or irreparable loss. I take no responsibility for anything you do based on my examples or the information that I provide here.
1.0 Introduction
Being able to effectively analyze the S.M.A.R.T. data on a hard disk drive (HDD) enables you to quickly identify problems that can aid you in recovering all of the data from it before it becomes irretrievable or requires significant expense to retrieve.
The vast majority of hardware repairs that I do for clients involve problems with hard disk drives. If the computer’s BIOS sees the drive okay and it is not making any unusual sounds, the first thing I do is examine the S.M.A.R.T. data on the drive.
S.M.A.R.T. stands for Self-Monitoring, Analysis and Reporting Technology and is the hard drive’s record of its internal diagnostic monitoring and usage statistics packaged for being accessed externally. The primary purpose of S.M.A.R.T. is to alert us to an impending failure of the drive while there is still time to save the data. When a hard drive reports that the S.M.A.R.T. health is FAILED you must get the important data off of it immediately and not use the drive anymore.
IT IS IMPORTANT TO UNDERSTAND THAT DIFFERENT MANUFACTURERS AND DIFFERENT DRIVE MODELS CAN STORE AND DISPLAY DIFFERENT SUBSETS OF S.M.A.R.T. DATA AND CALCULATE VALUES AND TOLERANCES DIFFERENTLY.
S.M.A.R.T. data is best used as a general guide. For specifics, the hard drive’s technical documentation must be consulted. Sometimes that information is difficult to come by and can be proprietary. For example, the formulas for how some manufacturers calculate normalized values for attributes can be very difficult to find.
Wikipedia entry for S.M.A.R.T.
Proper analysis of S.M.A.R.T. data
- Can help determine if the problem is physical damage or just logical damage.
- With logical damage, the drive can be trusted and continue to be used after being repaired.
- With physical damage, you want to get any important data off of the drive and replace it.
- Helps you choose the best method for recovering all of the data from the drive.
- Prevents you from accidentally doing things that may make matters worse.
In order to check the S.M.A.R.T. data on a HDD
- The drive should not be making strange clicking or beeping noises. That means that there is definitely physical damage and it should be sent to a facility with the proper tools and environment to repair/recover it.
- The drive needs to be accessible by the computer’s BIOS during POST (responds to the ATA command IDENTFY_DEVICE).
- In the case of external drives connected via USB they need to be detected by the computer’s Plug and Play software (responds to the ATA command IDENTFY_DEVICE).
After making sure that the connection between the drive and
the computer is correct and its quality is the best it can be, you need to
check the health of the drive itself. Then you can rule out physical damage
that requires repair with specialized tools in a controlled environment.
It is best to do this in Linux because Windows will try to
mount the drive’s file systems automatically and that may add layers of abstraction
that make it difficult to access the health statistics on the drive. A Linux
LiveCD or boot CD is fine.
1.1 Drive Health Check Summary Using S.M.A.R.T. Data
·
Does the drive make noises that it did not make before?
o
Loud clicking or a periodic beeping sound may indicate mechanical
damage. Physical damage may require the drive to be sent to a facility with the
proper tools and equipment to recover the data.
·
Does S.M.A.R.T. show any errors or bad attribute values?
o
See section 1.2 below for details on checking S.M.A.R.T.
attributes with ID#s 1, 5 and 197.
·
Does it pass the S.M.A.R.T. Short Self-Test?
o
See section 1.3 below for details on how to run the S.M.A.R.T.
Short Self-Test.
If it does not pass any of these tests, you need to either
get important files off of the drive immediately (if you can access them) or
make an image of the drive (see “Making an image with ddrescue” for how to make an image of a
failing drive) and attempt recovery of data from the image.
Tools
If a free tool helps you, please
donate to the people who created it.
GSmartControl by Alexander
Shaduri (using smartctl by Bruce Allen) (Free)
PartedMagic by Patrick J. Verner
(Free)
1.2 Check the S.M.A.R.T. Data on the Drive
To get started, download and burn a PartedMagic BootCD/DVD
and boot the computer with it.
The GUI version of GSmartControl is preinstalled in
PartedMagic and appears on the desktop as an icon that says DISK HEALTH beneath
it. (GSmartControl can also be run from Windows but it may be more difficult to
access a failing drive due to automated attempts to mount file systems on the
drive)
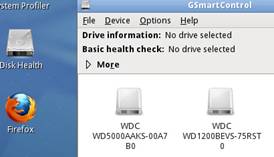
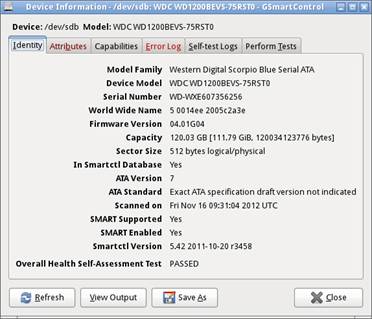
In this example, we’ll look at a Western Digital Scorpio
Blue hard drive that is known to have errors. We select our drive and the
results of the ATA interface command IDENTIFY DEVICE are displayed on the first
tab. Notice that at the bottom it says that it has passed the Self-Assessment
test. This drive has errors but not bad enough ones for it to fail S.M.A.R.T.
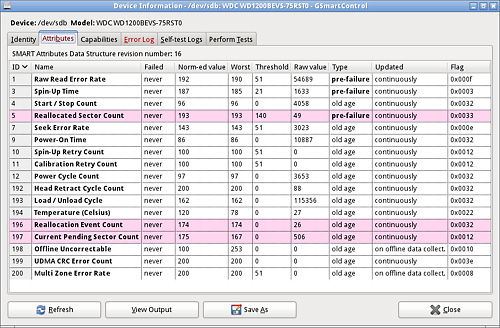
The Attributes tab gives a quick grid view of the S.M.A.R.T.
attributes that are tracked and reported by this drive and their data. We’ll
discuss these later when we look at the report we create for this drive. As you
can see, some of the lines are highlighted pink in order to bring attention to
potential error data.
The Capabilities tab tells us what S.M.A.R.T. features this
hard drive has available, including self-tests that it can do and how it
periodically saves the S.M.A.R.T. data.

The Error Log tab shows the error log data that is being
stored in the hard drive’s S.M.A.R.T. and usually only contains the last five
errors.
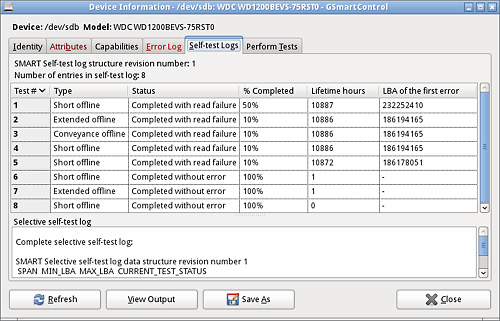
The Self-Tests Log tab shows the results of any Self-Tests
that have been run.
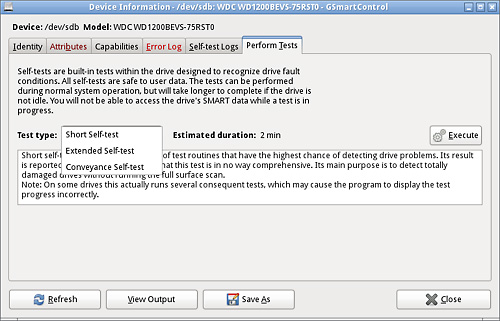
The Perform Tests tab has the options for you to have it
perform any of the S.M.A.R.T. self-tests available for that hard drive.
Click the SAVE AS button at the bottom of the screen to save
the S.M.A.R.T. report for the drive. Make sure that you have mounted a drive to
save it to first otherwise it will save it to the RAM disk which is in memory
and will disappear as soon as you shut down the computer. The easiest way to mount
a drive in PartedMagic is to click the MOUNT DEVICES button in the lower left
corner of the desktop.
Let’s look at our report.
First we see some of the information that the hard drive
reports when it is sent the ATA command IDENTIFY DEVICE. We also see if the
drive is in smartctl’s database of drives so it knows if there are any special
considerations for interpreting the S.M.A.R.T. data for that drive.
smartctl 5.42 2011-10-20 r3458 [i686-linux-3.4.4-pmagic] (local build)
Copyright (C) 2002-11 by Bruce Allen,
http://smartmontools.sourceforge.net

=== START OF INFORMATION SECTION ===
Model Family:     Western Digital Scorpio Blue Serial ATA
Device Model:     WDC WD1200BEVS-75RST0
Serial Number:    WD-WXE607356256
LU WWN Device Id: 5 0014ee 2005c2a3e
Firmware Version: 04.01G04
User Capacity:    120,034,123,776 bytes [120 GB]
Sector Size:      512 bytes logical/physical
Device is:        In smartctl database [for details use: -P show]
ATA Version is:   7
ATA Standard is:  Exact ATA specification draft version not indicated
Local Time is:    Fri Nov 16 09:31:04 2012 UTC
SMART support is: Available - device has SMART capability.
SMART support is: Enabled
Next is the drive’s health assessment. This is followed by
details of the S.M.A.R.T. capabilities that this drive has.
=== START OF READ SMART DATA SECTION ===
SMART overall-health self-assessment test result: PASSED

General SMART Values:
Offline data collection status:  (0x00)	Offline data collection activity
					was never started.
					Auto Offline Data Collection: Disabled.
Self-test execution status:      ( 112)	The previous self-test completed having
					the read element of the test failed.
Total time to complete Offline
data collection: 		( 5400) seconds.
Offline data collection
capabilities: 			 (0x7b) SMART execute Offline immediate.
					Auto Offline data collection on/off support.
					Suspend Offline collection upon new
					command.
					Offline surface scan supported.
					Self-test supported.
					Conveyance Self-test supported.
					Selective Self-test supported.
SMART capabilities:            (0x0003)	Saves SMART data before entering
					power-saving mode.
					Supports SMART auto save timer.
Error logging capability:        (0x01)	Error logging supported.
					General Purpose Logging supported.
Short self-test routine
recommended polling time: 	 (   2) minutes.
Extended self-test routine
recommended polling time: 	 (  70) minutes.
Conveyance self-test routine
recommended polling time: 	 (   6) minutes.
SCT capabilities: 	       (0x103f)	SCT Status supported.
					SCT Error Recovery Control supported.
					SCT Feature Control supported.
					SCT Data Table supported.
Next the attributes that are monitored by this drive are
listed. This is a pretty common subset of attributes listed in our report here
but you will come across others. For example, Hitachi drives often have a “G-Sense Error Rate” attribute that uses accelerometers
inside the drive to detect and record any strong shocks if the drive is dropped
or bumped very hard.
SMART Attributes Data Structure revision number: 16
Vendor Specific SMART Attributes with Thresholds:
ID# ATTRIBUTE_NAME          FLAG     VALUE WORST THRESH TYPE      UPDATED  WHEN_FAILED RAW_VALUE
  1 Raw_Read_Error_Rate     0x000f   192   190   051    Pre-fail  Always       -       54689
  3 Spin_Up_Time            0x0003   187   185   021    Pre-fail  Always       -       1633
  4 Start_Stop_Count        0x0032   096   096   000    Old_age   Always       -       4058
  5 Reallocated_Sector_Ct   0x0033   193   193   140    Pre-fail  Always       -       49
  7 Seek_Error_Rate         0x000e   143   143   051    Old_age   Always       -       3023
  9 Power_On_Hours          0x0032   086   086   000    Old_age   Always       -       10887
 10 Spin_Retry_Count        0x0012   100   100   051    Old_age   Always       -       0
 11 Calibration_Retry_Count 0x0012   100   100   051    Old_age   Always       -       0
 12 Power_Cycle_Count       0x0032   097   097   000    Old_age   Always       -       3653
192 Power-Off_Retract_Count 0x0032   200   200   000    Old_age   Always       -       88
193 Load_Cycle_Count        0x0032   162   162   000    Old_age   Always       -       115356
194 Temperature_Celsius     0x0022   120   078   000    Old_age   Always       -       27
196 Reallocated_Event_Count 0x0032   174   174   000    Old_age   Always       -       26
197 Current_Pending_Sector  0x0012   175   167   000    Old_age   Always       -       506
198 Offline_Uncorrectable   0x0010   100   253   000    Old_age   Offline      -       0
199 UDMA_CRC_Error_Count    0x003e   200   200   000    Old_age   Always       -       0
200 Multi_Zone_Error_Rate   0x0008   200   200   051    Old_age   Offline      -       0
Interpreting attributes
Attributes can be calculated differently by different
manufacturers so here are some general rules to guide you. Let’s look at our
drive’s values for attribute with ID# 1.
ID# ATTRIBUTE_NAME          FLAG     VALUE WORST THRESH TYPE      UPDATED  WHEN_FAILED RAW_VALUE
  1 Raw_Read_Error_Rate     0x000f   192   190   051    Pre-fail  Always       -       54689
ID#
This ID for the attribute is
displayed as a decimal number in this report but other reports may display it
in its native hexadecimal format.
Attribute Name
The human readable description of
the ID#
Flag
This is a hexadecimal description
of the purposes of this attribute combined so they can be represented by a
number. For example is it for performance, error rates or pre-fail or some
combination of these and others.
Value
This is a normalized version of
the data that starts at its best possible value (like 200 for this attribute)
and then decreases as it gets worse (now 192 for this attribute).
Worst
The worst that the Value has ever
been.
Threshold (THRESH)
The threshold for the Value. Once
the Value goes below this, the drive will consider it to be FAILED for this
attribute and depending on the attribute (like this one) the whole drive will
be considered to be failing and warnings will be sent to backup and replace it.
Type
A human readable version of the
Flag value but not as detailed.
Updated
How often the attribute’s value is
updated.
When Failed
If there was a failure where the
value reached or went below the threshold value, the power-on lifetime is
displayed here (usually in hours )
Raw Value
The raw non-normalized value of
the attribute.
The attributes that you should pay careful attention to are
ID#s 1, 5 and 197 (01, 05, C5 in hexadecimal). These are the most common
attributes with problems that cause a recoverable disappearance of drives.
ID#1 or 01 ‘Raw Read Error
Rate’ is related to the frequency of errors
appearing while reading RAW data from a disk. Ignore the Raw Value and go by
the normalized Value. If it is decreasing and getting close to the threshold value then the drive can probably be
recovered by making an image of it (see “Making an image with ddrescue” for how to make an image of a
failing drive) but it should then be
replaced after the data is retrieved from it.
ID#5 or 05 ‘Reallocated Sector
Count’ is the quantity of remapped sectors. This is the number of ‘hard’
bad sectors that have been reallocated by the internal controls of the hard
drive. The hard drive has a number of sectors in reserve to replace these bad
ones. These are inaccessible sectors that the drive expects to be bad forever
which means they are most likely physically damaged. Data that was in those
sectors was probably lost for good. Modern hard drives should not have any. My
personal ‘rule of thumb’ is that if there are less than 10 of these (Raw Value
is less than 10) and after checking it periodically during use I find that the
number is not increasing, I then believe the drive to be trustworthy for future
use but continued monitoring of the value is recommended. That’s my personal
rule but I would not fault anyone who replaces a drive because there is just
one of these.
ID#197 or C5 ‘Current Pending
Sector’ is the quantity of sectors that are not able to be read but have
not been reallocated yet. These are ‘soft’ bad sectors because there is still a
chance that they will be successfully read. The way they typically become ‘hard’
bad sectors is when an attempt is made to write to them and is unsuccessful.
When this happens, they are removed from this attribute and added to ID#5. When
this happens a new sector is pulled from the reserve pool of sectors on the
hard drive and used to replace this one. Many programs proclaim that they can
repair bad sectors. What they often do is not really repair them. Instead they
force the drive to attempt to write to them and if they are unable to it forces
them to be reallocated with sectors from the reserve pool and to the computer
user, it appears as if the ‘soft’ bad sector has been repaired. In fact, the
data in the sector has been lost and it has been replaced with a new and
healthy sector. I typically treat this number the same as ID#05. My personal
‘rule of thumb’ is that if there are less than 10 of these (Raw Value is less
than 10) and after checking it periodically during use I find that the number
is not increasing, I then believe the drive to be trustworthy for future use
but continued monitoring of the value is recommended. That’s my personal rule
but I would not fault anyone who replaces a drive because there is just one of
these.
Next in our report is the data from the S.M.A.R.T. data’s
error log and the results of any self-tests that have been performed. You can
identify if the errors have occurred recently by looking at the timestamp on
the error.
Error 58074 occurred at disk power-on lifetime:10886 hours (453 days + 14 hours)
In our case the most recent error occurred at 10886 power-on
lifetime hours and the report we ran was at 10887 power-on lifetime hours according to the value of attribute 09.
9 Power_On_Hours 0x0032 086 086 000 Old_age Always - 10887
So the error occurred within the last hour of it being powered on and is recent.
Common Error Codes in S.M.A.R.T. Error Log
- UNC – Uncorrectable Error
- BSY – drive busy
- ERR – The Last Result was an Error
- WRFT – Write Fault
- IDNF- Sector ID Not Found
- AMNF – Address Marker Not Found
- ABRT – Command Aborted
- TONF – Track 0 not found
- ECC – There is a problem reading from ECC and it does not match
SMART Error Log Version: 1
ATA Error Count: 58074 (device log contains only the most recent five errors)
	CR = Command Register [HEX]
	FR = Features Register [HEX]
	SC = Sector Count Register [HEX]
	SN = Sector Number Register [HEX]
	CL = Cylinder Low Register [HEX]
	CH = Cylinder High Register [HEX]
	DH = Device/Head Register [HEX]
	DC = Device Command Register [HEX]
	ER = Error register [HEX]
	ST = Status register [HEX]
Powered_Up_Time is measured from power on, and printed as
DDd+hh:mm:SS.sss where DD=days, hh=hours, mm=minutes,
SS=sec, and sss=millisec. It "wraps" after 49.710 days.

Error 58074 occurred at disk power-on lifetime: 10886 hours (453 days + 14 hours)
  When the command that caused the error occurred, the device was active or idle.

  After command completion occurred, registers were:
  ER ST SC SN CL CH DH
  -- -- -- -- -- -- --
  40 51 08 da da d7 ed  Error: UNC at LBA = 0x0dd7dada = 232250074

  Commands leading to the command that caused the error were:
  CR FR SC SN CL CH DH DC   Powered_Up_Time  Command/Feature_Name
  -- -- -- -- -- -- -- --  ----------------  --------------------
  20 00 08 da da d7 0d 00      13:53:18.903  READ SECTOR(S)
  20 00 01 00 00 00 00 00      13:53:18.902  READ SECTOR(S)
  c6 00 00 da da d7 00 00      13:53:18.902  SET MULTIPLE MODE
  20 00 80 da da d7 0d 00      13:53:15.871  READ SECTOR(S)
  20 00 08 ba 78 da 0d 00      13:53:15.868  READ SECTOR(S)

Error 58073 occurred at disk power-on lifetime: 10886 hours (453 days + 14 hours)
  When the command that caused the error occurred, the device was active or idle.

  After command completion occurred, registers were:
  ER ST SC SN CL CH DH
  -- -- -- -- -- -- --
  40 51 80 da da d7 ed  Error: UNC at LBA = 0x0dd7dada = 232250074

  Commands leading to the command that caused the error were:
  CR FR SC SN CL CH DH DC   Powered_Up_Time  Command/Feature_Name
  -- -- -- -- -- -- -- --  ----------------  --------------------
  20 00 80 da da d7 0d 00      13:53:15.871  READ SECTOR(S)
  20 00 08 ba 78 da 0d 00      13:53:15.868  READ SECTOR(S)
  30 00 08 ba 78 da 0d 00      13:53:15.864  WRITE SECTOR(S)
  40 00 08 ba 78 da 0d 00      13:53:15.864  READ VERIFY SECTOR(S)
  20 00 01 00 00 00 00 00      13:53:15.862  READ SECTOR(S)

Error 58072 occurred at disk power-on lifetime: 10886 hours (453 days + 14 hours)
  When the command that caused the error occurred, the device was active or idle.

  After command completion occurred, registers were:
  ER ST SC SN CL CH DH
  -- -- -- -- -- -- --
  40 51 05 d5 da d7 ed  Error: UNC at LBA = 0x0dd7dad5 = 232250069

  Commands leading to the command that caused the error were:
  CR FR SC SN CL CH DH DC   Powered_Up_Time  Command/Feature_Name
  -- -- -- -- -- -- -- --  ----------------  --------------------
  20 00 08 d2 da d7 0d 00      13:53:12.988  READ SECTOR(S)
  20 00 01 00 00 00 00 00      13:53:12.988  READ SECTOR(S)
  c6 00 00 d5 da d7 00 00      13:53:12.988  SET MULTIPLE MODE
  20 00 80 d2 da d7 0d 00      13:53:09.796  READ SECTOR(S)
  20 00 08 b2 78 da 0d 00      13:53:09.793  READ SECTOR(S)

Error 58071 occurred at disk power-on lifetime: 10886 hours (453 days + 14 hours)
  When the command that caused the error occurred, the device was active or idle.

  After command completion occurred, registers were:
  ER ST SC SN CL CH DH
  -- -- -- -- -- -- --
  40 51 7d d5 da d7 ed  Error: UNC at LBA = 0x0dd7dad5 = 232250069

  Commands leading to the command that caused the error were:
  CR FR SC SN CL CH DH DC   Powered_Up_Time  Command/Feature_Name
  -- -- -- -- -- -- -- --  ----------------  --------------------
  20 00 80 d2 da d7 0d 00      13:53:09.796  READ SECTOR(S)
  20 00 08 b2 78 da 0d 00      13:53:09.793  READ SECTOR(S)
  20 00 08 c2 da d7 0d 00      13:53:09.790  READ SECTOR(S)
  20 00 08 b2 78 da 0d 00      13:53:09.787  READ SECTOR(S)
  30 00 08 b2 78 da 0d 00      13:53:09.784  WRITE SECTOR(S)

Error 58070 occurred at disk power-on lifetime: 10886 hours (453 days + 14 hours)
  When the command that caused the error occurred, the device was active or idle.

  After command completion occurred, registers were:
  ER ST SC SN CL CH DH
  -- -- -- -- -- -- --
  40 51 07 cb da d7 ed  Error: UNC at LBA = 0x0dd7dacb = 232250059

  Commands leading to the command that caused the error were:
  CR FR SC SN CL CH DH DC   Powered_Up_Time  Command/Feature_Name
  -- -- -- -- -- -- -- --  ----------------  --------------------
  20 00 08 ca da d7 0d 00      13:53:06.877  READ SECTOR(S)
  20 00 01 00 00 00 00 00      13:53:06.876  READ SECTOR(S)
  20 00 08 c2 da d7 0d 00      13:53:06.874  READ SECTOR(S)
  20 00 01 00 00 00 00 00      13:53:06.873  READ SECTOR(S)
  c6 00 00 cb da d7 00 00      13:53:06.873  SET MULTIPLE MODE
Next we see the log of the results from any self-tests that have been run
SMART Self-test log structure revision number 1
Num  Test_Description    Status                  Remaining  LifeTime(hours)  LBA_of_first_error
# 1  Short offline       Completed: read failure       50%     10887         232252410
# 2  Extended offline    Completed: read failure       90%     10886         186194165
# 3  Conveyance offline  Completed: read failure       90%     10886         186194165
# 4  Short offline       Completed: read failure       90%     10886         186194165
# 5  Short offline       Completed: read failure       90%     10872         186178051
# 6  Short offline       Completed without error       00%         1         -
# 7  Extended offline    Completed without error       00%         1         -
# 8  Short offline       Completed without error       00%         0         -

SMART Selective self-test log data structure revision number 1
 SPAN  MIN_LBA  MAX_LBA  CURRENT_TEST_STATUS
    1        0        0  Not_testing
    2        0        0  Not_testing
    3        0        0  Not_testing
    4        0        0  Not_testing
    5        0        0  Not_testing
Selective self-test flags (0x0):
  After scanning selected spans, do NOT read-scan remainder of disk.
If Selective self-test is pending on power-up, resume after 0 minute delay.
1.3 S.M.A.R.T. Self-Tests
Most S.M.A.R.T. capable drives have several self-tests that
you can ask them to perform. For example, in GSmartControl you can find and
execute the available tests on the PERFORM TESTS tab.
S.M.A.R.T. Self Tests (Not available on all drives)
·
Conveyance Test
o
Intended as a quick test to identify damage incurred during
transporting of the device from the drive manufacturer to the computer
manufacturer.
·
Short Test
o
Checks the electrical and mechanical performance as well as the
read performance of the disk. This is the test that you want to run. If it
fails, make an immediate image of the drive (see “Making an image with ddrescue” for how to make an image of a
failing drive).
·
Long Test
o
A longer and more thorough version of the short self-test. It
scans the entire disk surface, with no time limit. If the drive has a little
damage, this test may make it worse. Do not run it until the important data
on the drive has been recovered and backed up elsewhere.
·
Selective Test
o
Some drives allow selective self-tests of just a part of the
surface.
The drive in this example had to have an image made of it
(see “Making an image with ddrescue” for how to make an image of a
failing drive) in order to recover the data from it. It was a successful
recovery but the drive was no longer trustworthy for continued use.
Excellent read, James. I never understood all those numbers in the attributes before.
Bill
Great article! Thanks so much for the info! I do have a question though. My father in-law has a drive that has failed the SMART test that came with the system (DELL if that helps). I booted off a Ubuntu live CD to see about backing up his data however, the Linux OS tells me that it cannot mount said drive as the NTFS was incorrectly closed last time. The OS on the suspect drive (Win7 32), comes up with an unmountable drive error. After reading the ddrescue article I suspect this drive may be simply KIA as even that states that one must mount said drive from within ddrescue. Would you have any pointers or advice in this satiation? I’d hate to tell Dad that he has no choice other than to sink lots of cash into an actual physical recovery center.
Thanks!
Hi Tim
What were the errors on the error log tab and were any attributes red on the attributes tab when you ran through the instructions in this blog post?
James
Hey James,
I’ll have to go run it again and see, IIRC the msg extended off the screen a bit. Thanks for the reply, lemme go run that test again 🙂
i have wd my passport and it says smart status unsupported.what does it means?are there any other test for it or what?
to ROOQASH : external drives connected via USB most often don’t allow SMART data to be accessed — you would have to remove it from its external case and connect it directly to a sata or esata port to be able to access the smart data.
Sometimes it depends on the order in which the drive is connected.
Try starting the computer with the drive plugged in or starting the computer first and then plugging the drive in.
One of those almost always works at our shop for accessing the SMART data.
Newer Passports can be difficult to remove from the enclosure and install internally. Some may even use the proprietary WD encryption that works with a chip in the enclosure which can make data recovery very difficult if it is removed.
Thank you for this good article, even though it didn’t help me much translate a normalized value (175) into a raw value for attribute 193, which is of special concern on laptops.